Speeding up a website is crucial for providing a better user experience and improving search engine rankings. If you’re looking to boost your website’s performance, this step-by-step guide will help you learn how to speed up a website quickly and easily.
Step 1: Assess Your Current Website Speed
Before diving into improvements, it’s crucial to assess your website’s current speed. Use tools like
- Google’s PageSpeed Insights,
- GTmetrix
- Pingdom
- WebPageTest
- Google Analytics and
- Browser Developer Tools etc
To analyze your website’s performance. These tools provide valuable insights into what’s causing your website to load slowly and where you need to focus your efforts. Such as –
Google’s PageSpeed Insights

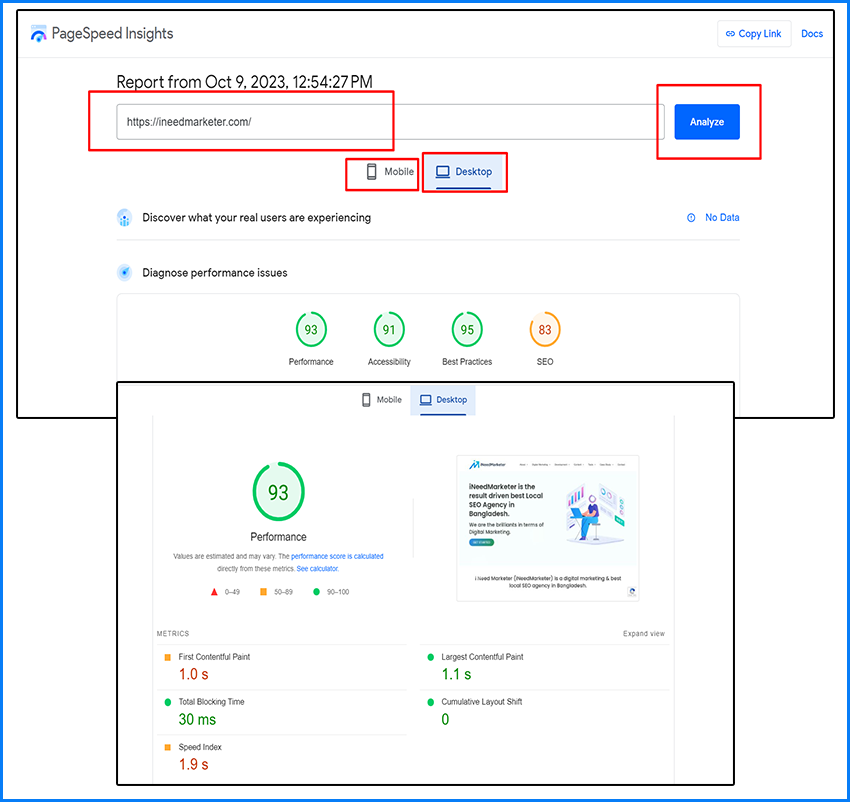
- Visit the PageSpeed Insights Website https://developers.google.com/speed/pagespeed/insights.
- Enter Your Website URL
- Analyze Your Website: After entering the URL, click the “Analyze” button or press Enter on your keyboard. Google PageSpeed Insights will then begin analyzing your website’s speed and performance.
- View the Results: PageSpeed Insights will provide you with a detailed analysis of your website’s speed and performance on both mobile and desktop devices. It will provide a score out of 100, along with recommendations for improvements.
- Mobile Score: This score reflects how well your website performs on mobile devices.
- Desktop Score: This score reflects how well your website performs on desktop computers.
GTmetrix

One of the most widely used tools for assessing website speed is GTmetrix. This resource is entirely free and can be completed in under a minute:
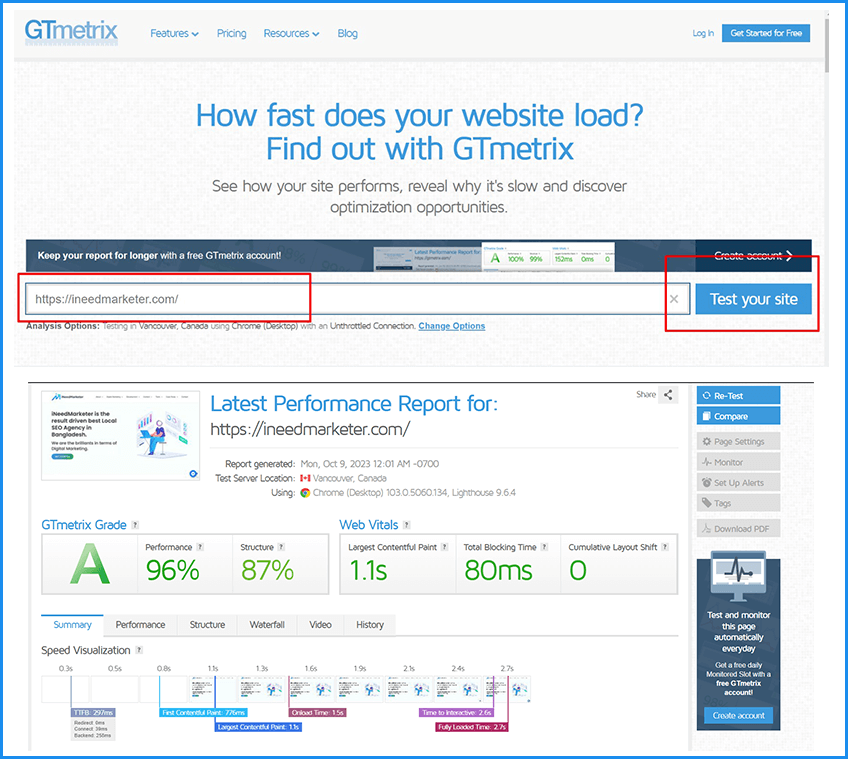
- Visit GTmetrix Website https://gtmetrix.com
- Enter Your Website URL
- Start the Test
- Wait for the Analysis
Upon completion, you’ll receive a grade indicating your website’s speed. Additionally, the test provides insights into your site’s performance, structure, and web vitals – which have become crucial for Google’s ranking algorithm.
Pingdom

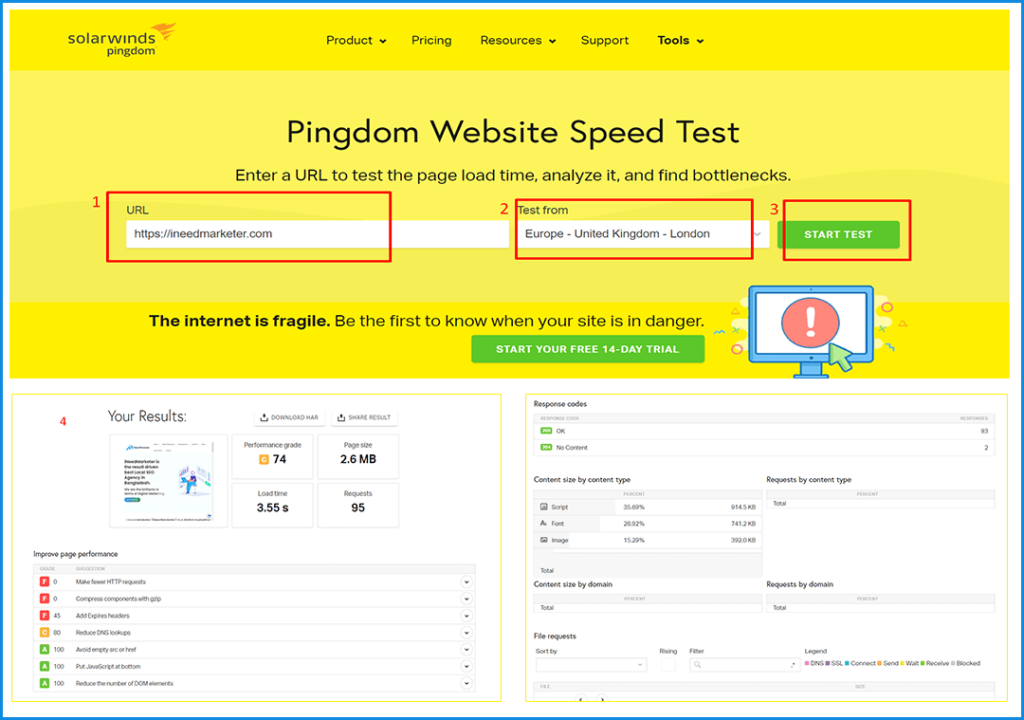
- Go to the Pingdom Website https://tools.pingdom.com
- Enter Your Website URL
- Choose a Test Location
- Click the “Start Test” Button
- View the Results
- Analyze Recommendations
That’s it! Pingdom provides a user-friendly interface to help you assess your website’s speed and identify areas for improvement.
WebPageTest

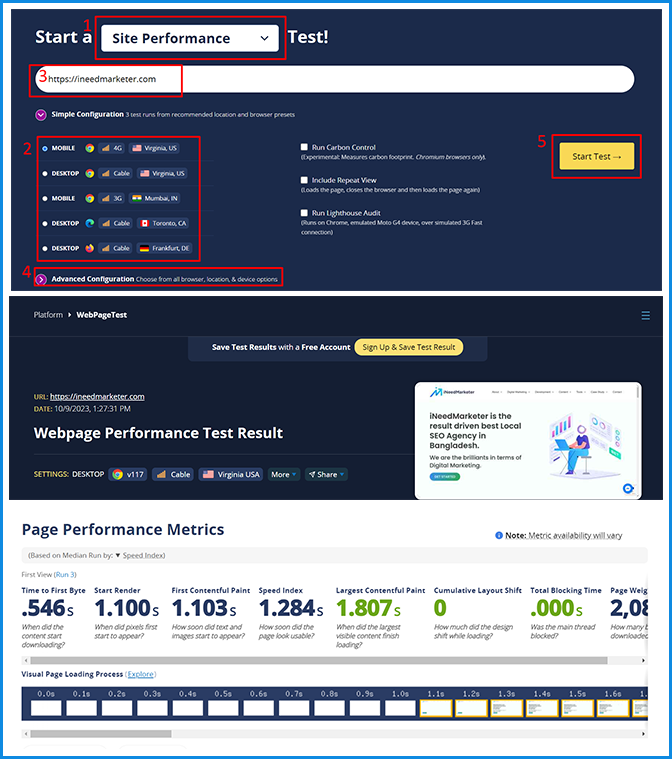
WebPageTest is an advanced tool that allows you to test your website’s speed from various locations and browsers. It provides a detailed breakdown of your website’s loading process and can help identify performance bottlenecks.
- Go to the WebPageTest website https://www.webpagetest.org
- Choose a Test Location
- Select a Browser and Connection Speed
- Enter the URL of Your Website
- Advanced Settings (Optional)
- Initiate the Test
- View the Test Results and Analyze
Google Analytics
Google Analytics can provide insights into your website’s performance. Check the Site Speed report to identify slow-loading pages and focus your optimization efforts on them.
Browser Developer Tools
Most modern web browsers come with developer tools that include performance profiling. You can use these tools to identify and fix performance issues on your website. In Chrome, for example, you can access this by pressing F12 and going to the “Performance” tab.
You need to create a Google My Business account. But not getting proper guidelines. Then you can read our blog post which shows – How to create a Google My Business account for free.
Step 2: Optimize Images

Large, unoptimized images are a common culprit behind slow-loading websites. To address this issue, follow these image optimization steps:
- Choose the right image format (JPEG for photographs, PNG for graphics)
- Resize images to the dimensions needed on your website.
- Compress images without sacrificing quality using tools like TinyPNG or ImageOptim
- Implement lazy loading to load images only when they come into the user’s viewport
Step 3: Minimize HTTP Requests
Each element on a web page (images, stylesheets, scripts) requires an HTTP request. The more requests, the slower your website. To minimize HTTP requests:
- Combine and minify CSS and JavaScript files.
- Use asynchronous loading for non-essential scripts.
- Employ a content delivery network (CDN) to distribute resources across multiple servers.
Some HTTP requests WordPress plugin suggested for you
Step 4: Leverage Browser Caching
Browser caching stores static files like images, CSS, and JavaScript in a visitor’s browser, allowing for faster subsequent visits. Implement caching by adding the appropriate code to your website’s .htaccess file (for Apache servers) or using caching plugins for content management systems like WordPress.
Step 5: Enable GZIP Compression
GZIP compression reduces the size of HTML, CSS, and JavaScript files, making them quicker to download. Most web servers support GZIP compression, so consult your hosting provider or server documentation to enable it.
How to do it by yourself?
- Check Server Support
- Ensure your web server supports GZIP compression. Most modern web servers, such as Apache, Nginx, and IIS, support GZIP out of the box.
- Configure Server
- For Apache: Modify your server’s configuration file (e.g., httpd. conf or .htaccess) to enable GZIP compression using the mod_deflate or mod_gzip module.
- For Nginx: Add GZIP directives to your Nginx configuration file, typically found in the nginx. conf or a site-specific configuration file.
- For IIS: Use the IIS Compression feature in the server settings to enable GZIP compression.
- Specify Compressible File Types
- Define which file types should be compressed (e.g., HTML, CSS, JavaScript) in your server configuration. You can specify these based on file extensions or MIME types.
- Content Delivery Network (CDN)
- If you use a CDN, ensure that it supports GZIP compression as well. CDNs often handle compression automatically, but it’s a good practice to check and configure if needed.
- Monitor and Adjust
- Regularly monitor your website’s performance and adjust GZIP compression settings as necessary to optimize load times and minimize server load.
Enable GZIP in the Apache web server through this code
<IfModule mod_deflate.c>
         AddOutputFilterByType DEFLATE application/javascript
         AddOutputFilterByType DEFLATE application/rss+xml
         AddOutputFilterByType DEFLATE application/vnd.ms-fontobject
         AddOutputFilterByType DEFLATE application/x-font
         AddOutputFilterByType DEFLATE application/x-font-opentype
         AddOutputFilterByType DEFLATE application/x-font-otf
         AddOutputFilterByType DEFLATE application/x-font-truetype
         AddOutputFilterByType DEFLATE application/x-font-ttf
         AddOutputFilterByType DEFLATE application/x-javascript
         AddOutputFilterByType DEFLATE application/xhtml+xml
         AddOutputFilterByType DEFLATE application/xml
         AddOutputFilterByType DEFLATE font/opentype
         AddOutputFilterByType DEFLATE font/otf
         AddOutputFilterByType DEFLATE font/ttf
         AddOutputFilterByType DEFLATE image/svg+xml
         AddOutputFilterByType DEFLATE image/x-icon
         AddOutputFilterByType DEFLATE text/css
         AddOutputFilterByType DEFLATE text/html
         AddOutputFilterByType DEFLATE text/javascript
         AddOutputFilterByType DEFLATE text/plain
          AddOutputFilterByType DEFLATE text/xml
</IfModule>
Step 6: Reduce Server Response Time
A slow server response time can significantly impact your website’s speed. To improve this:
- Choose a reputable hosting provider with fast servers.
- Opt for a content delivery network (CDN) to distribute your website’s content globally.
- Minimize the use of resource-intensive plugins or scripts on your website.
Step 7: Optimize Your Code
Clean and efficient code can significantly impact your website’s performance. Make sure to:
- Remove unnecessary HTML comments, whitespace, and line breaks.
- Eliminate redundant or unused code.
- Use server-side scripting languages like PHP efficiently.
Step 8: Prioritize Above-the-Fold Content

Above-the-fold content refers to the portion of your website that is visible without scrolling. Prioritize loading this content quickly to give users an immediate impression of your site’s speed. Minimize the use of large images or heavy scripts in this area.
Step 9: Monitor and Test Regularly
Website speed optimization is an ongoing process. Regularly monitor your website’s performance using tools like Google PageSpeed Insights or GTmetrix. Test different elements and tweaks to see what works best for your website.
Step 10: Mobile Optimization
Don’t forget about mobile users. Optimize your website for mobile devices to ensure fast loading times on smartphones and tablets. Use responsive design, optimize images for mobile screens, and prioritize mobile-friendly elements.
How can I check if a website is mobile-friendly or not?
- Using Google’s Mobile-Friendly Test tool https://search.google.com/test/mobile-friendly
- Manually resizing your browser window to see if the site adapts to different screen sizes
- Checking for a responsive design with elements that adjust to various screen sizes
- Testing website load times on mobile devices
- Verifying if the text is readable without zooming and links/buttons are easily clickable on mobile screens
- Online Mobile-Friendly Checkers W3C’s Mobile Checker
Conclusion
A fast-loading website is essential for retaining visitors, improving search engine rankings, and ensuring a positive user experience. By following these easy steps to speed up your website, you can enhance its performance, reduce bounce rates, and drive more traffic to your online presence. Remember, website speed optimization is an ongoing effort, so keep monitoring and tweaking to maintain top-notch performance.
